How to create Firebase Cloud Messaging Client App on Android to send push notifications to all installed application users.
Firebase cloud messaging is an awesome features for every android developer who wish to send thousands of push notifications with one click to each and every user who has installed their application. You can also control the complete push notification it self by setting up push notification title, push notification message body. We can also schedule our push notification timing from the Firebase panel. So here is the complete step by step tutorial for Android Firebase Cloud Messaging Tutorial Example.
Contents in this project Android Firebase Cloud Messaging Tutorial Example :-
- Watch the live application demo.
- Create a fresh android application project.
- Create, configure and connect Firebase to your Application.
- Add internet permission to your project.
- Start Coding.
- After finish coding send push notification from Firebase Panel.
1. Watch the live application demo to know how this app works and how can we send push notification from Firebase panel.
2. Create a fresh android application project.
3. Create, configure and connect Firebase to your Application :
1. Open firebase.google.com .
2. Click on Get Started button present on home screen.

3. Now log in with your Google Gmail ID.
4. Click on Add Project.

5. Enter your project name and select your country then click on CREATE PROJECT .

6. Click on Add firebase to your android app icon.

7. Create a fresh project in Android Studio.
8. Now Add application Package Name, App Nick Name, SHA-1 certificate. To get the SHA-1 certificate from Android Studio read my this tutorial, it is the easiest method to get SHA-1 certificate.

9. Now hit the Register App button.
10. Here you go now your google-services.json file has been successfully generated. Hit the Download google-services.json button to download this file physically into your computer.

11. Next step is to add google-services.json inside your project. So open your project and put( Copy ) google-services.json file inside YourProjectName/app folder. For example my firebase project name is Firebase-AndroidJSon.com then my app folder located is Firebase-AndroidJSon.com/app . Now copy the google-services.json file into app folder like i did in below screenshot.

12. Now open your Project’s build.gradle(Project) file.

13. Add classpath ‘com.google.gms:google-services:3.0.0’ inside dependencies block.

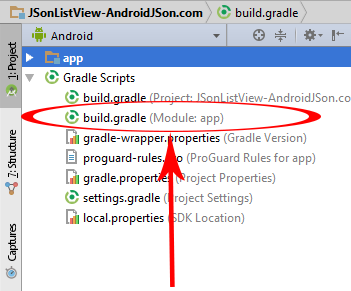
14. Open your project’s build.gradle(Module:app) file.
15. Add compile ‘com.firebase:firebase-client-android:2.4.0’ and compile ‘com.google.firebase:firebase-messaging:9.2.1’ inside dependencies block .
16. Then add apply plugin: ‘com.google.gms.google-services’ at the bottom of the page.
17. Now finally add below packagingOptions just bottom of buildTypes block like i did.
packagingOptions{
    exclude 'META-INF/LICENSE'
    exclude 'META-INF/LICENSE-FIREBASE.txt'
    exclude 'META-INF/NOTICE'

}
Final Screenshot :

4. Add internet permission to your project :
Open your project’s AndroidManifest.xml file and copy the below permission inside it. You will find the full AndroidManifest.xml file code at the bottom of this page along with all source code.
<uses-permission android:name="android.permission.INTERNET" />
5. Add service into AndroidManifest.xml file.
<service
    android:name=".MyFirebaseMessagingService">
    <intent-filter>
        <action android:name="com.google.firebase.MESSAGING_EVENT"/>
    </intent-filter>
</service>

<service
    android:name=".MyFirebaseInstanceIDService">
    <intent-filter>
        <action android:name="com.google.firebase.INSTANCE_ID_EVENT"/>
    </intent-filter>
</service>
5. Start Coding for project Android Firebase Cloud Messaging Tutorial Example :-
Code for MainActivity.java file.
package com.androidjson.firebasecloudmessage_androidjsoncom;

import android.support.v7.app.AppCompatActivity;
import android.os.Bundle;

public class MainActivity extends AppCompatActivity {

    @Override
    protected void onCreate(Bundle savedInstanceState) {
        super.onCreate(savedInstanceState);
        setContentView(R.layout.activity_main);
    }
}
Code for activity_main.xml layout file.
<?xml version="1.0" encoding="utf-8"?>
<android.support.constraint.ConstraintLayout xmlns:android="http://schemas.android.com/apk/res/android"
    xmlns:app="http://schemas.android.com/apk/res-auto"
    xmlns:tools="http://schemas.android.com/tools"
    android:layout_width="match_parent"
    android:layout_height="match_parent"
    tools:context="com.androidjson.firebasecloudmessage_androidjsoncom.MainActivity">

    <TextView
        android:layout_width="wrap_content"
        android:layout_height="wrap_content"
        android:text="Hello World!"
        app:layout_constraintBottom_toBottomOf="parent"
        app:layout_constraintLeft_toLeftOf="parent"
        app:layout_constraintRight_toRightOf="parent"
        app:layout_constraintTop_toTopOf="parent" />

</android.support.constraint.ConstraintLayout>
Code for MyFirebaseInstanceIDService.java file.
package com.androidjson.firebasecloudmessage_androidjsoncom;

/**
 * Created by AndroidJSon.com on 5/13/2017.
 */

import com.google.firebase.iid.FirebaseInstanceId;
import com.google.firebase.iid.FirebaseInstanceIdService;

import android.util.Log;

public class MyFirebaseInstanceIDService extends FirebaseInstanceIdService {

    private static final String Firebase_Tag = "FirebaseIDService";

    @Override
    public void onTokenRefresh() {

        //Getting token.
        String refreshedToken = FirebaseInstanceId.getInstance().getToken();

        //Show token on logcat
        Log.d(Firebase_Tag, "Refreshed token: " + refreshedToken);

    }

    private void sendRegistrationToServer(String token) {
        // Write down your code here to do anything with toke like sending on server or save locally.
    }
}
Code for MyFirebaseMessagingService.java file.
package com.androidjson.firebasecloudmessage_androidjsoncom;

/**
 * Created by AndroidJSon.com on 5/13/2017.
 */

import com.google.firebase.messaging.FirebaseMessagingService;
import com.google.firebase.messaging.RemoteMessage;
import android.content.Intent;
import android.app.NotificationManager;
import android.app.PendingIntent;
import android.graphics.Bitmap;
import android.graphics.BitmapFactory;
import android.media.RingtoneManager;
import android.net.Uri;
import android.support.v4.app.NotificationCompat;

public class MyFirebaseMessagingService extends FirebaseMessagingService {

    @Override
    public void onMessageReceived(RemoteMessage remoteMessage) {

        //Method To Generate Notification.
        FirebaseCloudMessageFunction(remoteMessage.getData().get("title"), remoteMessage.getData().get("body"));
    }

    // Function to Generate Push Notification After Receiving Response from Server.
    private void FirebaseCloudMessageFunction(String messageTitle, String messageBody) {

        // Creating Intent.
        Intent intent = new Intent(this, MainActivity.class);

        // Device vibrate pattern.
        long[] pattern = {500,500,500,500,500};

        // Adding FLAG_ACTIVITY_CLEAR_TOP to intent.
        intent.addFlags(Intent.FLAG_ACTIVITY_CLEAR_TOP);

        // Creating Pending Intent object.
        PendingIntent pendingIntent = PendingIntent.getActivity(this,0 , intent,PendingIntent.FLAG_UPDATE_CURRENT);


        // Creating URI to access the default Notification Ringtone.
        Uri defaultSoundUri = RingtoneManager.getDefaultUri(RingtoneManager.TYPE_NOTIFICATION);

        // Converting drawable icon to bitmap for default notification ICON.
        Bitmap DefaultIconBitmap = BitmapFactory.decodeResource(getResources(), R.mipmap.ic_launcher);

        // Building Notfication.
        NotificationCompat.Builder builder = new NotificationCompat.Builder(this)

                // Adding Default Icon to Notification bar.
                .setLargeIcon(BitmapFactory.decodeResource(getResources(), R.mipmap.ic_launcher))

                // Setting up Title.
                .setContentTitle(messageTitle)

                // Setting the default msg coming from server into Notification.
                .setContentText(messageBody)

                .setAutoCancel(true)

                .setVibrate(pattern)

                .setSound(defaultSoundUri)

                .setContentIntent(pendingIntent);

        NotificationManager notificationManager = (NotificationManager) getSystemService(NOTIFICATION_SERVICE);

        notificationManager.notify(0, builder.build());
    }
}
Code for AndroidManifest.xml file.
<?xml version="1.0" encoding="utf-8"?>
<manifest xmlns:android="http://schemas.android.com/apk/res/android"
    package="com.androidjson.firebasecloudmessage_androidjsoncom">

    <uses-permission android:name="android.permission.INTERNET"/>

    <application
        android:allowBackup="true"
        android:icon="@mipmap/ic_launcher"
        android:label="@string/app_name"
        android:roundIcon="@mipmap/ic_launcher_round"
        android:supportsRtl="true"
        android:theme="@style/AppTheme">
        <activity android:name=".MainActivity">
            <intent-filter>
                <action android:name="android.intent.action.MAIN" />

                <category android:name="android.intent.category.LAUNCHER" />
            </intent-filter>
        </activity>
<!-- Defining Services -->
        <service
            android:name=".MyFirebaseMessagingService">
            <intent-filter>
                <action android:name="com.google.firebase.MESSAGING_EVENT"/>
            </intent-filter>
        </service>

        <service
            android:name=".MyFirebaseInstanceIDService">
            <intent-filter>
                <action android:name="com.google.firebase.INSTANCE_ID_EVENT"/>
            </intent-filter>
        </service>

    </application>

</manifest>
Screenshot :

7. After finish coding send push notification from Firebase Panel :-
- Open Firebase .
- Select your application.
- Goto Notifications.
- Click on SEND YOUR FIRST MESSAGE .
- Enter Message body and title, Hit the Send Message button.